Bioactive vivariums bring a little piece of nature into your home, and are a great way to provide a natural and healthy environment for your pet. When set up correctly, bioactive setups are easy to maintain and require less daily maintenance than a non bioactive enclosure.
Bioactive vivariums consist of a primary inhabitant and a cleanup crew of springtails and isopods, and usually live plants. In a bioactive vivarium, the cleanup crew breaks down the waste of the primary inhabitant, eliminating smells and the need to clean up after your pet every time they poop. The cleanup crew also controls mold and fungus growth in humid environments. In a bioactive vivariums with live plants, the cleanup crew breaks down any dead plant matter, such as dead leaves.
When choosing your cleanup crew, make sure that they are suitable for the type of environment (tropical vs desert) and that they are a correct size so as not to become a snack for the primary inhabitant. For example, dwarf isopods are a good choice for a crested gecko enclosure because they will be too small to eat, whereas most larger isopod species will be fine in a dart frog enclosure because they will be too large to eat. Click here for our guide on choosing the right isopod.
That being said, it is not necessarily a bad thing if your primary inhabitant eats isopods. They are a good source of calcium and can offer entertainment and enrichment for your primary inhabitant. If you choose to house an isopod species that your primary inhabitant may enjoy eating, we recommend setting up a separate isopod culture and then moving isopods from that culture into your vivarium as needed.
Below is a step by step guide for building your first bioactive vivarium!
How to Build a Bioactive Vivarium
This section covers the basics to building a temperate or tropical bioactive vivarium.
Step 1
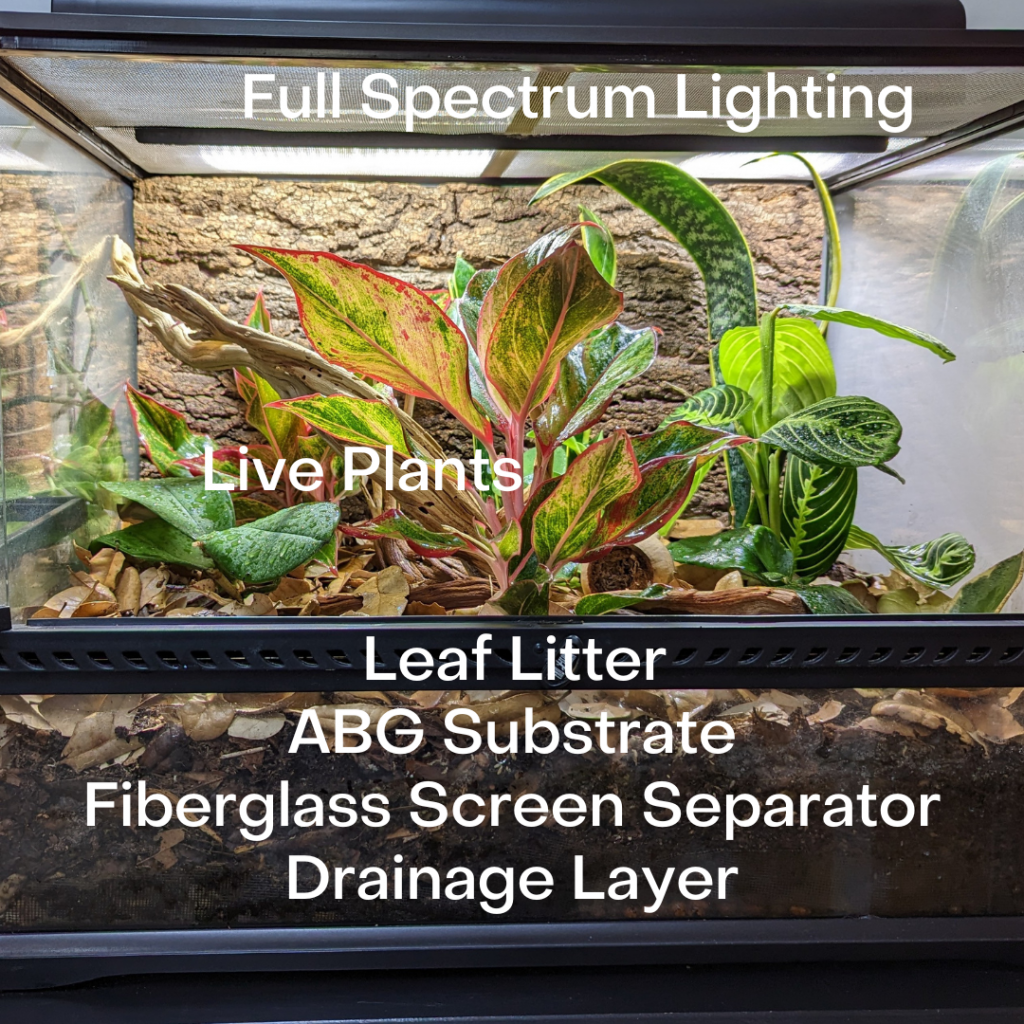
Choose an appropriately sized enclosure for the animal you plan on housing. There are a lot of different types of tanks and enclosures you can choose from. I personally prefer the front opening style of enclosures for the ease of access, but what style you use is entirely up to you. At the same time, select the lighting system you will be using for the enclosure. You’ll want to make sure that you have appropriate lighting for your plants as well as your animal. For plants, I use full spectrum bulbs. Compact fluorescent and LED bulbs are both fine choices, but make sure you pay attention to how much heat is generated by the type of bulb you plan to use if you have a temperature sensitive species. LED bulbs generate less heat and cost less over time to operate, but cost more upfront to purchase. I like to put my lights on automatic timers, so the plants always get a consistent amount of light – and so I don’t have to remember to turn them on and off every day.
Step 2
Install drainage tubing for access to the drainage layer. I simply install a 3/8″ piece of tubing, so that the bottom of the tube is resting on the bottom of the enclosure, and the top of the tube will stick up slightly over the substrate layer. This allows a 1/4″ piece of tubing to be inserted should you need to siphon water out of the drainage layer. You can also install bulkhead fittings and valves, but this requires drilling directly into the glass of your enclosure.
Step 3
Install the drainage layer. Expanded clay balls are typically used for this layer since they are much lighter than something like gravel. You may also see these referred to as Hydroton, Hydroballs, LECA, or LDL, depending on the branding. Make sure you rinse the clay balls to remove any dust before adding them to your vivarium.
Step 4
Install the substrate separator. This is a screen that is used to keep the substrate separate from the drainage layer. There are many products on the market for this. I use fiberglass window screen and cut it to the appropriate size. You want to make sure you use something that is non toxic, won’t rust, and will allow springtails to pass through. Cut the screen to a size slightly larger than your vivarium base and lay it down on top of the drainage layer.
Step 5
Install the substrate layer. The substrate is the most important part of the vivarium. You want to make sure that you use something that will break down quickly and will not compact and bind the plant roots. You also want the substrate to be able to properly support your clean up crew. I use ABG (Atlanta Botanical Gardens) substrate mix.
Step 6
Add the clean up crew – springtails and isopods. I like to do this step before adding the leaf litter layer for purely aesthetic reasons – if the springtails or isopods are in substrate, I don’t want to dump that substrate on top of my completed leaf litter layer.
Step 7
Add the leaf litter layer. Don’t be stingy with your leaves – the clean up crew will rely on the leaf litter for food and shelter. If you are taking time between steps, make sure you do this immediately after adding your clean up crew.
Step 8
Water your vivarium. If you are taking time between steps, make sure you water the vivarium as soon as you add your clean up crew so they do not dry out. When watering your vivarium, make sure that enough water is added so that there is some in the drainage layer, but not so much that the drainage layer is full and the substrate layer is saturated. You can swap this step with step 9 – personally I find it easier to plant in damp substrate rather than dry substrate, especially if working with cuttings.
Step 9
Plant your plants. Make sure the plants you use are safe for your primary inhabitant. You should also size your plants according to your primary inhabitant – use larger plants for larger animals, and use plants that can be easily climbed for arboreal animals. In addition to rooted terrarium plants, air plants (Tillandsia) are a fun addition to any terrarium and can be safely hot glued to backgrounds or other decorative pieces.
Keep in mind when spacing the plants that many vivarium plants will grow quickly, so you don’t have to fill in all available space right away when planting. Part of the fun of building a vivarium is watching it grow!
A note about terrarium plants: no matter where you purchase your plants from, you should always make sure your plants are treated properly before they go in your vivarium. Plants should be bare root – meaning no dirt or other substrate is on the roots. If you want to use plants that are currently in soil, you can gently remove the dirt by hand by brushing as much off as possible and then washing the rest off in the sink. Finally, all terrarium plants should be bleach treated (within reason, moss and air plants should not be bleach treated). Soak the plants in room temperature water for about 15 minutes. Then soak them in a 19:1 bleach solution for about 3 minutes (19 parts water to 1 part bleach). Rinse thoroughly until you are confident no bleach remains.
Step 10
Turn on the full spectrum lights, and wait. Wait 3-4 weeks before adding your primary inhabitant, no matter how amazing the vivarium is and no matter how proud of it you are. Waiting allows the clean up crew to establish, and allows the plants to take root in the substrate.
